Saturday, December 29, 2012

One room at a time


I've been working on getting rooms finished.  Not just the construction part of them done, but decorated as well.  I worked on the master bedroom last week... I painted it for the third time, painted our side tables with a faux in-lay look, raised the curtains up and over, and got Matt to put round shelves in one of the corners of our room.  I'm currently shopping around for a duvet cover, probably white, to go on our duvet we have but I never use because the only cover we had is maroon and doesn't match at all.  I like this one from IKEA and its only $39.99.  I just might order it soon.
.  .  .  .  .  .  .
The last couple days I have been working on our bathroom.  I patched holes we had from where a towel bar used to be, caulked any places that needed it (like the window, and by the shower where the wood didn't match up), and most painful was scraping the grout off the glass tiles that has been mocking me for over 2 years. 

 
The grout set faster than I could get it on and wipe it off.  I think grouting above ones head is the worst.  Scraping over head wasn't any less painful.  But I got them scraped.  Tomorrow I will be painting the ceiling (also over head, of course), using a tube of white grout in the caulk gun and filling the holes where grout didn't make it the first go around (over head), painting the rest of the walls the same color as our bedroom, and trying to hunt down wood frames for two skeleton leaves I have framed in silver frames at the moment.  Then I'll put the room back together and it will be done, once and for all.  That would make two spaces in our house that are finished; the kitchen is the other.  I will post before and after pictures after I get it finished, hopefully next week.
 

Sunday, December 9, 2012

Finding My Passion

 
I've been thinking a lot lately about what job I would feel most challenged and passionate about.  I really love working with the kids at the Montessori school.  I like finding fun new crafts to incorporate into the afternoons what they are learning in the mornings.  I like seeing all the interesting wooden Montessori works.  I do feel like I'm lacking my hands on art for myself.  Like in college I majored in art (photography) but also minored in crafts.  I would dare to say that everyday I did something artistic or creative.  And if you ever want to test your creativity, try being in classes with 20 other creative people and try to out imagine them.  It's no small feat, and I definitely don't think I succeeded every time.  But the point was that I pushed the limits of my creativity, and kept finding more and more fun processes and techniques I loved.
.   .   .   .   .
Over the Thanksgiving break I was talking to my family about how I keep thinking how awesome it would be to open a toy shop with Matt.  I would imagine and design everything, Matt would make what needed to be made out of wood, and I would do all the finishing details.  It could start as just an Etsy shop but could grow into a brick and mortar store someday.  I could blog the process, cause let's face it, I haven't been very disciplined about blogging about house renovation. I think that is in a big part to the fact I'm not really passionate about our house renovation.  I am pretty passionate about the fact I wish it were finished already.
.   .   .   .   .
So Matt and I have started the brainstorming process for our future etsy shop.  My little sister, Haley suggested the name, Matelia  which is a combo of Matt and Amelia.  I'm really liking it as a strong possibility.  It's short, unique, and has meaning behind it.  Anyway, I may be blogging more about our process.  Who knows, maybe we will get the shell of the shop up and running soon.

Thursday, November 8, 2012

24 Hour Stained Glass

I took a stained glass workshop a couple years ago and was just keeping that skill in my back pocket.  I've known for a long while that we would have a stained glass in the guest bathroom above the door to the toilet room.   I knew the size and a few months ago I knew the color scheme I'd be working with.  I guess I just chicken out sometimes when there is a project on the horizon that I can't put at least part of the work onto Matt.  This stained glass would be my design, my gift card money used, my time and potentially my hands sacrificed to a few cuts.  A few weekends ago I put on my big girl pants and got to work.
* * * * * *
Matt and I went to Hobby Lobby to pick out the glass on Saturday afternoon.  I thought we might have a color in the stained glass, but the options were pretty bad.  They had a couple choices I might would have used had they not been irridescent.  So we got a grey with white swirl, white with white swirl (yes there is such a thing), clear with white swirl, clear with clear swirl (again it's possible), and a faux seeded glass.  It was really just a guess to get 5 different pieces but it turned out great.  Here is the initial designs I had come up with. 
 
 
I decided on the herringbone pattern because eventually our front walkway will be herringbone patterened brick, and our dining room table we're going to make will be herringbone patterned wood.  I thought it would tie together nicely.  The bottom sketch is what we were going for.
 
 
The Saturday night that we bought the glass, we went to Matt's parents house to hang out and watch football and a movie, War Horse.  The movie was better than I thought it would be, but to be honest my expectations were pretty low.  While watching the movie I drew, scored, and cut all the glass into 2"x6" pieces.  The next morning I went to church in Fulton then came home and got to work on my stained glass.  I laid out the pattern like you see above and asked Matt what he thought about it.  First I'd tried where the colors were spiratic but decided I like them making more of a chevron effect by having all one color in a line.  Matt liked it ok, but was loving the grey pieces the most because they look like the marble detail we have around the top of the shower.  I actually hadn't thought of that so I shifted all the rows, grey in the middle, with white above and below it, then the clear at top and bottom.

 
This is the pattern, with pieces numbered.  I had to be able to put them back in the same place after wrapping them with the copper tape so the process is to number each piece, ( I used different colored sharpies for each row) then trace and number the place on the paper template.  The sharpie either wipes off, or you use a steel wool to scrub it off. 

 
I finished soldering about 9 or 10 that Sunday night.  It went much faster than I thought it would and I only poked myself with a red hot piece of solder stick one time.  I still have a mark from it.

 
This is it leaned against the headboard in the guest bedroom.  You can see the swirls better with something dark behind it.

 
And this unfinished spot in the bathroom is where the stained glass is going to wind up.  Matt still has to trim it out before we can put it up but I'm pretty excited to see the finished product in place.  I'll post a picture when we get the bathroom farther along.

Sunday, October 14, 2012

Pear Preserves and Painting

My Sunday consisted of waking up too late to go to any of the 10:00 church services and not being able to find a local church with services at 11:00 to try out. I made my second batch of pear preserves, which was easier having had the experience of the first big batch. This batch turned out almost red while the first batch I made was closer to a dull caramel color.

 
I also started a painting.  It has been so long since I really worked on art, not a craft, not our home renovation... honest to goodness art.  It was kind of scary but also really exciting.  I'm doing a painting of a fawn.  It's pretty big, measuring in at 30"x40".  I feel like my style of painting has been lost.  I know though, that even if this one doesn't turn out how I'm imagining it, I still have about 15 canvases stock piled that I can keep painting on.  My friend Joannah and I talked about that while on one of our walks... how the hardest part sometimes of making art is not giving up after a bad piece, or two, or three.  Perseverance and practice.

 
This is what my art work area looks like.  It's in the living room by the big window and facing the tv.  I realized that if I don't have music or television going in the background I'm not going to be able to sit still long enough to paint anything.
.
.
.
I also watched more movies and Netflix than I should have in one day.  Revolution, Ghost Whisperer, and Cider House Rules for the first time.  I really enjoyed that movie.  I also started about four other movies but none of them held my interest.  Overall it was a pretty good day. 

Sunday, September 9, 2012

Guest Bedroom- A year of Difference

 
Here is the guest bedroom after finishing the drywall and putting in the new windows.  Still didn't have the new ceiling or floors.  This picture was taken almost a year ago exactly.
 
 
This is the guest bedroom today.  The window still needs to be trimmed out, and there are a few decorating things it lacks, but in general it looks pretty close to finished.

 
The guest bedroom a year ago.

 
The bed today, with new headboard hung.

 
This headboard was made using a 30"x80" hollow core door cut down to 30"x60".  I had a pillow that was weird and kind of gross that I tore open to find that it laid flat the same size as my headboard would be.  That may not make any sense.  Oh well.  My mother-in-law helped me with this project last weekend.  We glued down the stretched open pillow, then stretched and stapled batting over the whole thing.  We then took two $10 curtain panels from Fred's, tore them into 3 inch strips long ways and short ways, stapled the top, and wove the pieces.  Once woven, they were all secured on the back with my staple gun.  I may go back someday and add a ribbon detail around the edge... but who knows.  Well, this post goes out to my mom who always likes to see what new things we have done.  Thanks for the support.

Sunday, September 2, 2012

Bookshelf and Windowseat


This is one of the original photos I took of our house, pre demolition.  Looking back, I have to laugh a little at my ignorance as to what it would take to transform this wreck of a house.  With more than two years under my belt of home renovation I can finally see rooms as what they will be.  Lovely, functional spaces in our home.

 
This is the living room after the floor was torn up, the wall on the right had been redone, but still lacked new windows and ceiling.


This is what the living room book case looks like today.  I have the doors put on and the shelves organized.  I would like to put trim on the window seat, but that is really the last project for that area.

 
Here's a look at the left bookshelf, and a better view of the doors with their eyebrow arch.  I was hoping it would complement the adjacent archway.

 
I love collecting things, which you will see when I post pictures of the bookcase in the dining room.  I collect vintage cameras, globes, keys, and such.  I also love bikes.  Matt just got me a vintage Sears bike we will have to fix up.

 
Here is the window seat.  Have I noted yet that my awesome husband built all of this, the bookcases, the window seats, the ceiling, and even replaced the windows.  He's a good man to let me design whatever suits my fancy and then he builds it.  We make a good team.  The window seat has storage space that you can get to from under the cushion.  My mother-in-law did an amazing job covering that giant cushion for me.

 
A shot of the other bookcase.  More of my camera and globe collections.

Tuesday, August 7, 2012

Just killing time...

Well, good news.  Matt and his dad's A/C repair business has been steadily busy since their first job.  Bad news, Matt has been gone most days and nights for the past week.  I feel like I haven't had any real time with him in far too long.  I am currently waiting to hear from him about his job to see if he'll be home before I go to bed. Anyway, while I'm waiting for him to come home, I've been searching for cool clocks.  Here's what I've discovered so far.


I love the different size and colored frames with different patterned paper in each.  This one seems to have endless possibilities.  Found at decor8. A good thing about this clock is the size.  It could be made to be as big as I want.  I'm thinking of putting a clock above where our television is in the living room.


The nature loving girl in me has a strong pull towards this bark encircled wood clock.  It is actually a DIY on design sponge.  Seems really easy but I don't know that it would be quite big enough for the space.


I also found this etsy shop, ObjectifyHomeware, that has some really creative patterns on their clocks.  It made me realize, that with a wood circle, I could really make a clock look however I want.

Another wood circle clock with a pattern.


A cool striped wood clock.  Stripes could be done to complement the room.


I like the idea of this one.  A square piece of wood is much easier to cut than a circle, but it could still have a unique "shape".  This is a definite possibility.

One more etsy shop that I really love the work of is uncommon.


I love the color of the outside of the clock.  I love the fact the center part is wood or some kind of particle board, and the numbers are engraved.  I like the slightly industrial look of the screws and the pop of red on the second hand.  This clock was designed really well.  It's just not quite the right size.


And what's not to love about this scalloped, pale blue clock with fancy hands and a red second hand.  Plus the carved numbers... if I lived near the person who makes these, I'd want to be friends with them.

Anyway, that's the end of my clock shopping.  I'll have to check out my DIY options at Hobby Lobby and Lowes to see what I can create myself.

Tuesday, July 31, 2012

Mirror turned Chalkboard


This month I am hosting a bunco group at my house so I am finally motivated to get some decorating done.  The entry room is in need of some help.  I have a key holder by the front door, but decided I wanted something to hang above it.  I found this mirror I'd bought 2 years ago from Hobby Lobby in the garage and decided it would be my first project.


First I cut a piece of computer paper to the size of the mirror so as to not get spray paint on it. 


Next I took it outside, laid it on some newspaper, then used the blue spray paint I used on our outside lights and flower pots.  I figured the blue would complement the green entry.


Second layer of spray paint.


Third and final layer of spray paint.  Painting things in thin layers will keep it from having drips or splotches.


Here is the mirror with it's finished paint.


Next I used an old newspaper to cut a very precise template for the chalkboard contact paper I bought. 


I was a bit unsure about chalkboard vinyl surface but it seems to work really well.  I also plan to use it to make labels for all of our clear containers... flour, sugar, and what not.


Here's the paper, cut to size.  It took me a while to put it on, but the good news is I was able to keep peeling it up and nothing bad happened.  It seems to be pretty resilient.


Chalkboard in place.   The End.

Wednesday, July 4, 2012

Kitchen, Before and After


It has been more than two years since Matt and I started our home renovation.  We basically camped out in two rooms for months using a hot plate and a microwave to prepare food.  With the exception of our hardwood floors, and the kitchen cabinets his cousin built, we have built this house with our own hands.  It has been a giant labor of love.  This summer I only work 2 days a week at the Montessori school so I am making it my goal to finish and clean this house... one room at a time.  The first room I completed was the kitchen.  Here are the before and afters with some added pictures of the details.  Enjoy!


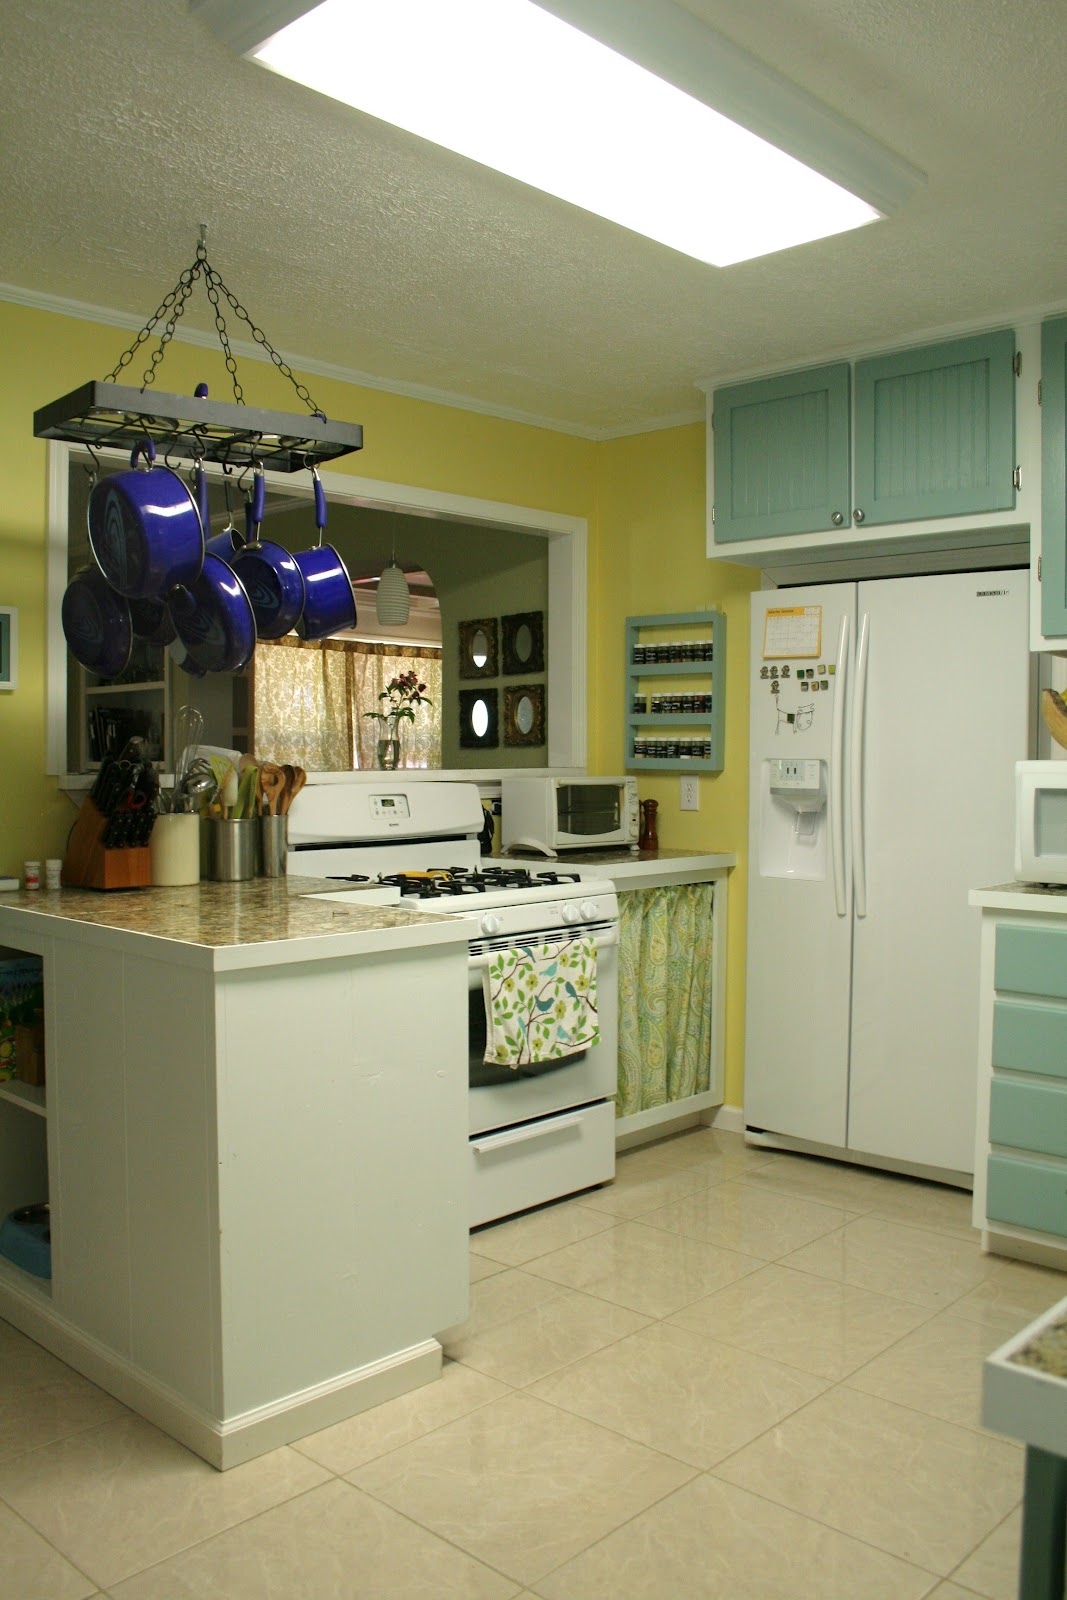
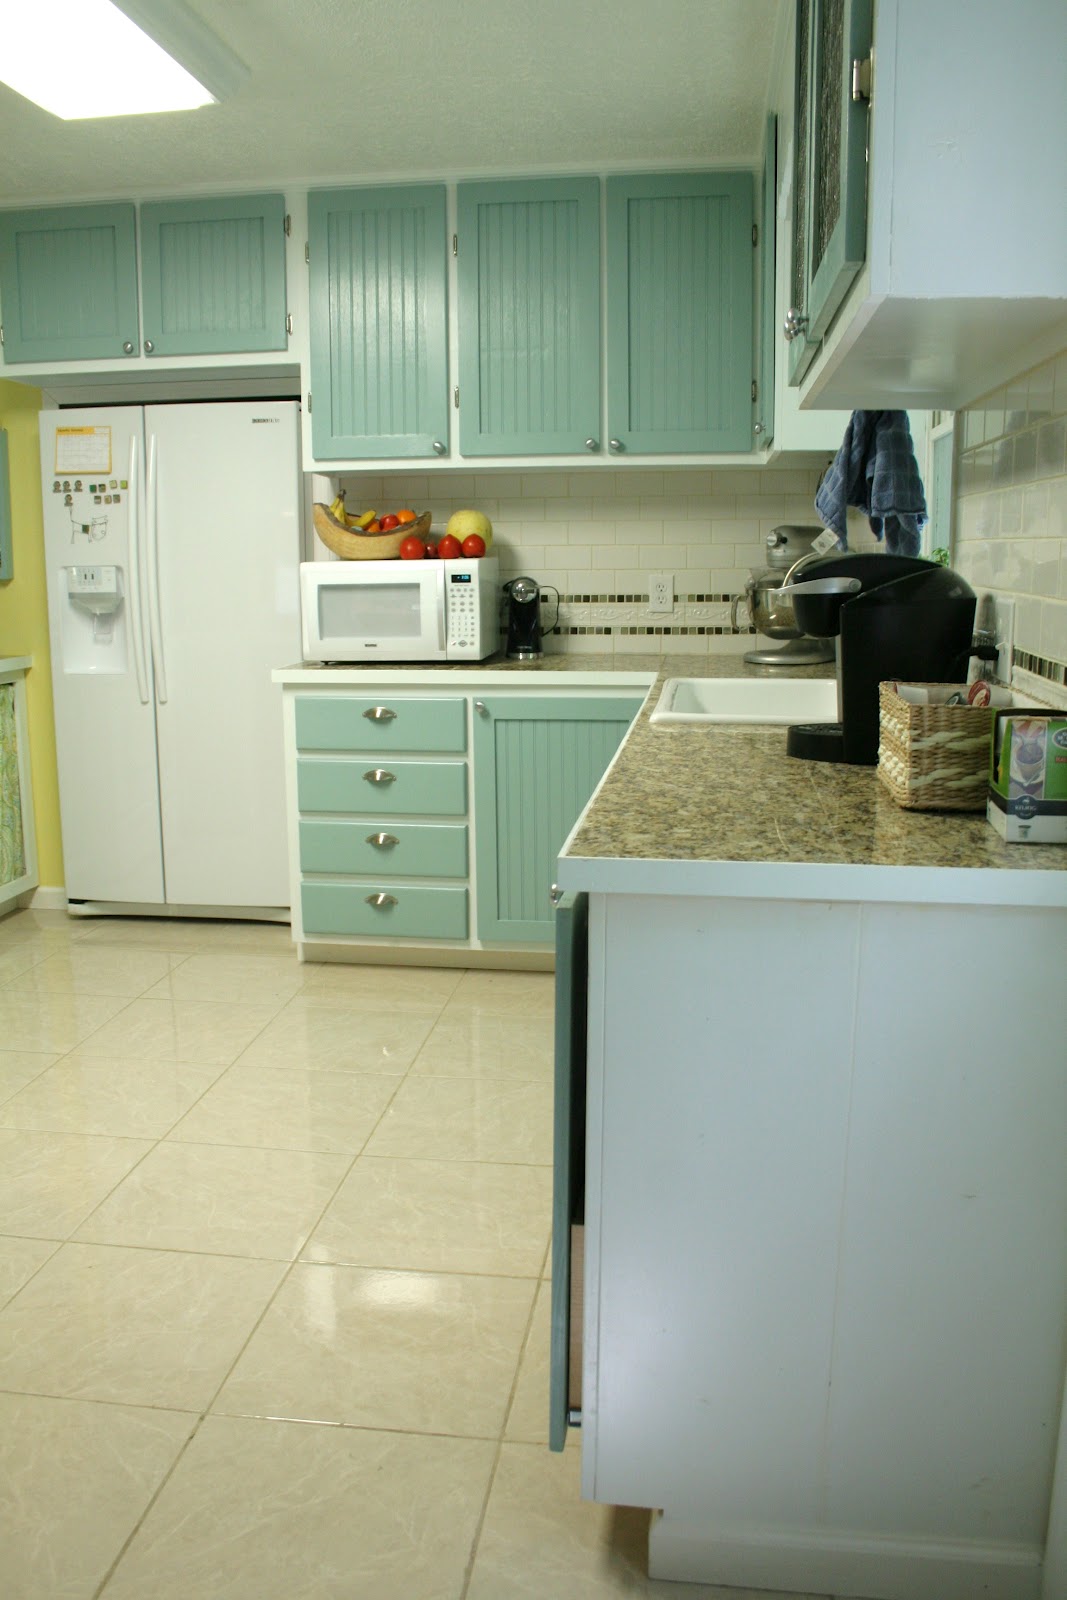
We picked the blue of the cabinets to match our dishes.  I know its not for everyone but I love the feel it gives.


We wanted granite counter tops but after pricing out the slabs we knew it was out of our budget.  Matt's sister has a tiled granite counter and I've always thought it was lovely so we decided to do the same.


The backsplash adds a lot to our kitchen.  I put up the tile, Matt cut any pieces that needed cutting, then I grouted it.  It was one of the projects that once I started it, I wasn't sure it would ever get finished. 


We really wanted to open up the kitchen to the entry/dining room more than it was.  There was a small square cut out of the wall above the stove when we bought the house and we just decided to expand on that idea.  We made a pass through with a granite tiled shelf.  We also opened up where there was a regular sized door and made a large opening.


The original door into the kitchen.


Same spot with the opening much wider and cabinets built out to meet it on the left.  You can also see in this picture where we put in a small shelf for cookbooks and Buck's food bowl.


The pantry on the left was made deeper, and cabinets were built off this wall.  That tiny door on the right seemed so strange.  On the other side of that wall is the guest bathroom.


My mom had said before that if she ever redid her kitchen she would want a desk in it.  I took her advice and added this one on the cabinet wall.  We have really used it a lot since building it.


I searched for a pot rack for our apartment when we lived in it 3 years ago.  They were all very much out of my budget.  Then at a flea market I came across this black one for $7.  I had to have it.  I went and bought black shower curtain hooks that have worked great as the pot rack hooks.


I found this door knob set at TJ Maxx a while ago and bought it before I ever had a place for them.  They could actually be functional if they were on both sides of a door, but I decided to use them on the front of our kitchen closet instead.


I love love love love our giant sink.  It is one of my favorite things about the kitchen.  I can set multiple pots flat in the sink with water soaking in them.  I always hated how sinks were never big enough to do the jobs for which they are intended.  I also love our tall faucet.  It's nothing fancy but I really like how functional it's been.


These are succulents I planted in little coffee mugs.  I have several serving pieces of Peter's Pottery so my big sister and I traded, some of my mismatched red leaf pottery for her Peter's mugs.  They look great with the colors of my kitchen.


I wanted to have glass front cabinets so Matt's cousin Isaac built these door frames for me to get glass cut and put into them.  Then the other day when we were working on finishing the kitchen, we happened to have a giant roll of chicken wire at our house, since we soon hope to have a chicken coop, and Matt and I decided we'd like to try the doors with chicken wire.  We really like the country look of it.